Sunday, September 23, 2012

My super zingy three lemon tart

For any occasion be it in your own house or as a guest in someone else's there is nothing better than has a stylishly simple tart to have for your sweet moment. So I thought id share this fantastic recipe my Lemon tart. Iv found when flicking through recipe books that a lot of lemon tarts call for nine to ten lemons which in fairness sounds like a lot for a tart that you just want to whip up in a jiffy.
So for this tart you will need:
175g flour
25g icing sugar
100g cold butter
1 egg yolk
1 tbl water

This is your short crust pastry, I like to combine it by hand but if you have a food processor be my guest.  In a bowl pop your flour, icing tugar and diced cold butter. next rub the contents through your fingers and thumbs basically until all the butter has reduced into teeny tiny pea like crumbs. Next I pour in the tablespoon of water and one egg yolk and combine with one hand(so you you have one left to answer that phone that always rings when your mucked up to the elbows!!) once its come together plonk it out on your board and knead it briefly so as it rolls out perfectly but not to much that makes it tough as old boots!!!
Next I roll it out nice and evenly thin making sure its large enough to fit in your flan tin which is 23cm wide. Now you might think iv lost it altogether but iv actually used a silicone flan tin for this, so when the pastry is rolled out I put an upside down silcone tin over it I then gently and I mean gently fold the pastry up onto the tin and whip it right side up because I can find if I roll the pastry onto the rolling pin to put in your tin its an accident waiting to happen lol. A little trick I saw on the telly box one time was if you get a scrap of left over pasty roll it into a ball it works as the perfect tool to press your pastry into the sides of your crinkly tin.
Pop tinfoil over the pastry leaving the pastry uncut over the sides, then pour some baking beans over that. Pop in your pre heated oven at 190' for 10 minutes. After that trim edges and pop back in uncovered for a following 8-10 mins. Once thats done take out and let cool.
Whilst your base is baking in the oven get stuck in to your filling, for this you will need:


zest of 3 large lemons
130mls juice
4 eggs
220g caster sugar
125ml cream

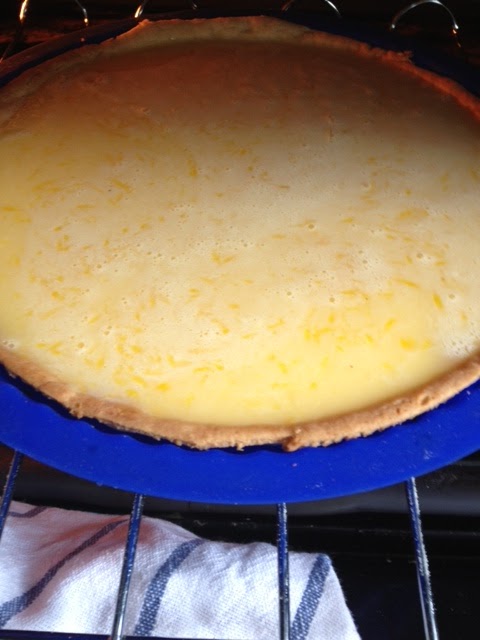
so in a bowl whisk your eggs and sugar together, next add the zest and juice of your lemons until its light and well combined. Once your happy with your mixture pour in the cream and mix again. When your crust has cooled pop it back on your oven tray( oven temp reduced to 150') and SLOWLY pour in your lemony goodness. And whatever you do slowly push the tray back in and gingerly close the door. Set your timer for 30minutes you will be looking for a set filling with a wobbly middle ha ha never thught so dont be afraid to check it just before the time. if its baked to long cracks will appear and it will taste of lemon rubber!!!!


what i like to do as a cheeky finale is sprinkle some sieved icing sugar over the top and gently bronze with a wee blow torch and voila we are done....ENJOY(",)

Friday, September 7, 2012

Out of this world brown soda bread


When you think brown soda bread you think of mini you sitting at your Grannys kitchen table, and on  your plate homemade soda bread with thick cut slices of ham on top...YUM...basically brown soda bread equals nostalgia.
There are certain shops you will drive to just to get your brown bread fix like Avoca  or Superquinn your guaranteed perfection every time.So i thought to my self its about time I make my own brown soda bread that I can pass on down to my kids and so on. I tried a few recipes over the past year from friends and recipy books but I just couldn't seem to master them, they would come out stogy and half raw which for a semi perfectionist drove me bonkers. Even my best friends Mam has a fantastic recipy  she got from her Mam that we used to eat when we were younger whenever Grandma used to come and stay in hers and it was DIVINE, but when I went to make it id fall flat on my face lol...
So here we are after a year of tinkering and tedious testing I have finally perfected my brown soda bread , and maybe its the Lemsip talking and making me feel awfully generous but iv decided to share my recipy.....ENJOY

230g Hearts Delight
210g Plain Flour
1 tsp Salt
1 tsp Bicarb Soda
50g Sesame Seeds, extra for the top
50g Poppy Seeds
2 Medium Free range eggs
410ml Buttermilk

In a large bowl add the Hearts Delight, Plain flour, salt and bicarb and mix with your hand then sprinkle in the seeds and give the mixture another swirl. In another bowl/measuring cup break in the two eggs and whisk lightly then pour in the buttermilk and mix. Combine your wet ingredients now with your dry and combine with a wooden spoon. This mixture will be quite wet but that is the consistency we are looking for.
Next line your 2lb loaf tin with grease proof paper and slowly pour it in. Pop it in your pre heated oven and bake for 40mins @ 200'c
When it comes out of the oven take it out of the tin and peel off the grease proof paper and give it a wee pat under neath and it will have a hollow sound, thats exactly what your looking for that means its baked through if you didn't have that sound you are guaranteed that when you put in your skewer it would come out sticky!!!!
i love the way the seeds give this bread a fantastic texture not only on the top of each slice but the whole way through it has a super crunch to it without been overwhelming ha ha...ENJOY

Sunday, September 2, 2012

wedding cake no.2

The next wedding cake I'm going to dissect for you is one of my fave cakes. The concept for the cake was so far fetched I had to jump at the chance to do it as I knew an opportunity like that doesn't come along every day.
Visually we wanted this cake to look like a giant bouquet of roses all in gorgeous pastel colors. So first things first I had to work out how many hand made roses it would take to cover the three tier cakes, an eight, ten and twelve inch cake, long story short I decided it would take close to three hundred roses to cover this bad boy. To make the rose I used sugar paste and a lot of it, I think it would actually hurt my head to work out how many kilos i used in the end. The roses were quite time consuming as each petal was made from scratch and each rose needed at least seven petals. Like a real rose it should be assembled in layers, the bud in the middle three petals hugging the bud and finally three more petals hugging the first layer of petals. Each petal then has to be gently folded back to give the delicate look of the rose, now picture that times 300 lol.
Once the cakes and roses were complete it was the daunting task of assembling it all together. I found these cool cake wires especially for sugar paste flowers, once I had them all cut to size I then inserted them into the base of the roses using whisked egg whites as a natural adhesive.
Now you know that moment before you try something out for the first  time and god only knows if its even going to bloody work or not well picture me sitting at my kitchen table with a sea of roses sitting in front of me, talk about anxiety but BOOM it all came together without a hitch...and BREATH.
So the fun part was now upon us putting all the roses in their new homes , making sure the colors were even steven and all snuggly fit beside each other.


The best part of it all was hearing the screams of excitment from Emma the bride through her text after i sent her the final pic, and then even better was the moment I closed the door after the cakes were collected and were driven off ha ha....

Its a dirty job but someones gotta do it


So part of my blogging adventures into the world of baked treats are busy not only am i sharing about my yummy creations but I'm also taking on the tedious task(ha ha) of trying out treats that are on the market ready prepared for us to combine and whack in the oven...
The first "almost ready" treat i delved into was the JUST' ROL(bake it fresh) DOUGH....in the form of Pain au chocolat. Instantly when i clapped eyes on this wee red box i got giddy, to me pain au chocolat are yummy pillows of buttery goodness that you usually see in the baked section of M&S or in Starbucks but they are not something that i or many of us would just whip up on a whim.
The istructions read quite well. Firstly open the cardboard can fully and unroll the pastry, once you have that done you then have to divide up the flattened dough into six pieces which is super easy as the pieces are practically separated for you. Next you take two pieces of the dark chocolate sticks and pop them on either end of the dough and roll each end over the chocolate sticks, when you have all six pastries assembled you then place them on your baking tray upside down. Whack them in your pre heated oven set your timer for the required time, pop your coffee machine on and sit back and chill out.


I was so chuffed with the end result they were exactly like the real mc Coy and the taste well all i can say is ate two of them with the greatest of ease that i felt it only right to give the rest away because if i didn't i would have eaten them all in one breath (",)

Tuesday, August 21, 2012

Cakes glorious cakes

Wedding season is well under way for me, I definitely think cupcake wedding cakes as a genre is getting stronger in the world of weddings . Once the happy couple have taken the leap and chosen cupcakes the next decision is whether or not to have a cutting cake on top or purely have cupcakes. Over the next few blogs I will be showcasing some of this years wedding cakes and the ideas behind them.
This first cake I'm going to talk about is this super cute cake, the flavours that were chosen are always a great crowd pleaser as there is something really for everybody. The winning flavours were double chocolate, zingy lemon and vanilla bean.
For me I like the theme of the day to be captured in the cake completely, for instance the flowers that were used in the reception were ivory in color and lucky for us the florist had kept a few small flowers aside for us so I was able to incorporate them in the display. I used gold metallic cases for all the cakes which gave a great platform for the colors of the frosting and really showed off the pipping styles.
The cutting cake was a 7" chocolate layer cake with a chocolate buttercream filling, the outer design was a vintage rose design in an ivory color, we decided to keep it a neutral color so not to take from the colors of the cupcakes.
All in all it was understated, beautiful and sofisticated with a cheeky twist thrown in for good measure with the ball and chain bride and groom sitting on top....

Wednesday, March 14, 2012

Martha's blueberry muffins

When you think of Martha Stewart you automatically think she's the queen bee of cooking and baking, so when I came across this recipe for "Martha's blueberries muffins" I flew down to the shop and bought up every blueberry they had(two meesily punnets)


I made the crumb topping first so as to have it on hand to sprinkle on my muffins before I pop them in the oven...you will need the following...
3 tablespoons of butter
1/2 cup of flour
1/4 cup of brown sugar
1/4 teaspoon salt
1/2 teaspoon of cinnamon
(I reduced the measurements of the orignal crumb topping as I found it made way to much)
Mix the flour, sugar, salt and cinnamon together in a bowl and in another bowl melt the butter briefly so it's softened but not gone completely runny. Pour your butter into the dry mixture and combine to make a crumbly texture, pop it to the side.
Next comes the muffin mix you will need the following...
1tablespoon of fresh baking powder
1 teaspoon salt
3 cups and 2 tablespoons of plain flour
6 tablespoons of butter/stork
1 1/4 cups of sugar
1 egg and 2 egg yolks
1 teaspoon of good quality vanilla
1 cup of milk
2 cups of washed blueberries


So I combined all the dry ingredients together by putting it through a sieve, in the mixer I creamed the butter/stork and sugar together until it was light in colour. Next I added the egg to combine it before adding the two egg yolks once I was happy with the texture I poured in the vanilla. So the next part of all batters I like to do in stages as I find it keeps the mixture quite light, pop half the dry mixture in the bowl and mix slowly before adding 1/2 the cup of milk then I repeat with the dry mixture and the wet. Turn off your machine and give it a good scrape around the edge to ensure flour is all combined, once your a happy camper pop the blueberries in and gently fold them in to the batter so as not to burst them all.
Pop them in their muffin cases 3/4 of the way full then sprinkle the crumble on top...
Have your oven preheated to 170'c and your timer on 30 minutes, stick em in and enjoy warm (beware of bursting hot blueberries lol)

Thursday, February 16, 2012

De-lish pastry

On my mission to find all things yummy in the world of baking iv come across some real hit and misses time wasters if you will, there's nothing worse than putting the time and effort into a newly discovered recipe a hopeful gem for it to turn out like a lump of crap. So when I found this "fool proof" recipe for the perfect pastry I just had to try it out.....I found it in one of my Jamie Oliver's books and I have to say its fantastic, and I find it's so versatile it can be used for sweet or savory il elaborate in a wee bit.
Now I love baking using American style measurements it's not as daunting for people to try when I pass them on, so get yourself a decent set of measuring cups and spoons so your recipe will work every time.
Start off with one cup and two table spoons of chilled real Irish butter and pop it in your bowl or mixer and cream together with one cup and six table spoons of caster sugar and don't forget to add a pinch of salt. Next briefly combine three and a quarter cups of flour to your creamed mixture. Now in a mixing jug add one tablespoon of good vanilla extract, four egg yolks and three tablespoons of milk. Whisk together and add to your dry mixture, combine it all together until it forms a ball I find you don't want to over do it as you will be rewarded later in the taste. Wrap your pastry in cling film and pop it in the fridge.
After its been resting for a good twenty minutes flour your board and your pin and gently roll it out. This mixture will line two large pans with plenty left over to make a snuggely blanket for the top of them to make the perfect pies.
If its an apple or fruit pie/tart your desiring I always recommend you part bake it for at least ten minutes so you don't end up with a soggy bottom.
I like to mix things up when making savory dishes by adding the zest of an orange and or a lemon to the pastry mixture especially if it's for a fruit tart of crumble it really compliments every element of your dish.
So be brave take a deep breath and try it out you won't be disappointed (",)


Thursday, January 26, 2012

The tough part of food blogging "research"!!!

So I'm sitting here waiting for a batch of cupcakes to bake and I'm gazing across at all the ingredients that are involved in making the perfect cupcake, or any baked treat when it comes to it. And apart from a cracking recipe it's all about quality at the end of the day.
I remember when I was tinkering with the idea of becoming a devotee to the baking world I would experiment with less than pricey ingredients, all the while thinking I was getting a deadly bargain but soon realizing that wasn't the case. It was like was like playing roulette with disaster sometimes you'd get a sweet batch of goodies other times you'd just get muck, rubber muck at that...
So here are two of my cupboard must haves that will stand you the test of time.
Nielsen-Massey Madagascar Bourbon Pure Vanilla, this little bottle will never let you down, you will not find a higher quality vanilla. You can find it in superquinn or tesco. I like to add it with my wet ingredients so it's easily dispersed.
Another super and reliable must have is Hearts Delight wheatmeal flour I use this with equal quantities of plain flour to make the yummiest brown soda bread ever(recipe to follow) the quality makes it


fool proof for all that healthy baking you get up to.


- Posted using BlogPress from my iPad


Friday, October 7, 2011

When the mixer decides to quit

Well what's worse in the world of baking than running out of ingredients....your mixer deciding to go on strike, it must have joined a union while I wasn't looking!!!
I had the stork and caster sugar measured out and plonked in the mixing bowl the oven was pre heating, I turn on the machine the bowl does a twirl but alas the whisks stand still. I turn it on, turn it off take the whisks out pop them back in and nada not a kick out of it they just hang there all smug....
The hubby had popped out so there was only one option, it's time to make my cupcakes old skool stylee. I took my wooden spoon and gave it welly and you know what a rush of nostalgia hit me and all of sudden all was well in the world again(",)
The cupcakes were in the oven 5 mins and there I was having a showdown with the diced real butter the thoughts of turning it into smooth silky butter cream by hand was making me weak, in walks himself twiddles(technical word)with the machine and shazam everything starts working like a dream.....AWESOME now back to work


Rebecca, Num Num cupcakes

Thursday, October 6, 2011

The adventures of a delivery driver!!!

There's nothing like that moment when your finished the last swirl on your cupcakes or even better yet all the little models are made and are been as good as gold and staying where they should stay on the cake. you've managed the mission impossible of getting said cake in said box, our cool business cards are strategically placed on the box. Then it dawns on you I now have to get the yummy cake to the customers house in one piece aaaaaagggghhhh!!! When your making your master piece your thinking this looks awesome your not thinking hmmmmm I wonder how it will handle irelands glorious roads.... This one time we were delivering a princess cake to the far side of Dunlavin and by god I thought I was going to have a nervous break down every bump we went over it was like the cake was taunting us.we had Surrounded the perimeter of the castle with pink wafers and one by one they came down luckily for my nerves we had packed our "emergency kit" which includes buttercream a spatula and extra sprinkles so all was well in the worl of princess castles.
Other tricky deliveries included a giant cupcake with a fondant model of jessy from toy story sitting on top to Dublin, grand roads but killer round-a-bouts out emergency kit included tooth picks that day lol


Rebecca, Num Num cupcakes

© Num Num Cupcakes. Powered by