
Wednesday, December 9, 2015
Festive choir boy cake topper
Here's another funny festive tutorial for you to add to all your Christmas bakes.
Enjoy
Rebecca x

Festive Angel cake topper Vlog
So excited to share my festive Angel cake topper tutorial with you just in time for Christmas.
Enjoy
Rebecca x
Saturday, November 28, 2015
All things Gingerbread {edible gifts}
Tis the season to be jolly (Q the fal la la's) 


Well it's Christmas over load on the baking front in my kitchen, my Christmas cakes & plum puds are baked for my customers & family so I thought I'd start my edible gift blogs for this year.
Kicking off the edible ideas is my scrummy gingerbread men and there naff gaff the gingerbread house. This recipe will make a whopping 60 ginger bread men or a house and approx 25 gingerbread men. I bought my gingerbread 3D cookie cutter from Aldi and it cost €4.99 I also bought my gingerbread cookie cutters from Supervalue and the cost just under €3.
For this recipe you will need:
200g Dark muscovado sugar
250g butter
6 tablespoons of golden syrup
600g plain flour
2 teaspoons baking soda
4/12 teaspoons of ground ginger
Royal icing
1 egg white
250g of Icing sugar
Pre heat your oven to 180'c.
In a pot melt the butter, sugar and golden syrup together, in a large bowl sift together the flour, baking soda & ground ginger.
Pour the butter mixture in the flour and mix together until it forms a firm dough ball, wrap in cling film and pop in the fridge until it has cooled and has time to firm up.
Flour your work surface liberally and proceed to roll out your cookie dough making sure to flour your rolling pin. I recommend rolling the dough out to the thickness of a €2 coin as when baked the dough can puff up slightly.
This dough can be crumbly so don't be frightened if it seems to break apart when you roll it out. I found if you persuade it back into shape with your fingers it will hold that shape to the very end of the bake.
Cut out your gingerbread army or your house and place them on your lined baking sheet, then pop back in the fridge to harden up again. This is the best way to keep your cookies shape. I made little holes at the top of the gingerbread men's head before I baked them to tie ribbon through to hang on the Christmas trees.
Bake for 15mins then let cool on a cooling rack. While they are cooling make your royal icing by whisking the egg white until white and frothy then add in the icing sugar and whisk until smooth. You want the Royal icing to be quite stiff so it acts like a glue to hold the walls of the house together.
You will need at least 4 cups or glasses to help support your house as you assemble it. Scoop the Royal icing into a piping bag snip the tip and use it as you would glue. When I had the walls stuck together I went back over the seams with the "glue" to ensure they were well supported.
The roof will be the trickiest part to add to the house. I ran glue along all the edges of the tops of the walls popped the roof on then supported the end of the roof with the cups to prevent it from sliding off, this is why you need the "glue" to stiff so it feels like it has set instantly.
Once the house has successfully stayed in place now the fun begins. Pipe on the windows & doors your can even pipe on the slates on the roof. Use all kinds of candy as decoration for the house, think Hanzel & Grettal when designing it.
Both the gingerbread men & the house keep really well in the fridge & freezer.
Have fun making these the smell alone will make the process worth it.
Enjoy
Rebecca x
Monday, November 2, 2015
Spooky Ghost Cake Pops
So I did it I finally plucked up the courage to post my first Vlog. I thought I would start off by showing you all how to make my spooky yet super cute ghosts.


Here is the link to my YouTube channel "Num nun bakes"
I've also added a few extra pics of my other cake pops I made over the past few days
Hope you enjoy the Vlog and give the cake pops a go...
Enjoy
Rebecca x
Monday, October 26, 2015
Pumpkin pie pops
We are so lucky where we live when Autumn arrives as our little village transforms into an autumnal colour palate. Monasterevin is an old village so a lot of the roads and properties on them are home to the mighty oak trees and the ever changing beech trees. 


The road that leads to Lotties school is adorned with orange and red leaves it's a pretty cool sight.
So another orange thing I love about Autumn is the almighty pumpkin I just love them so much I get excited when I see them in the shop. I really love the little gnarly gourds you can pick up for decoration I may or may not have them around the house.
This year my pumpkin blog is a funny twist on the pumpkin pie which I've blogged about before.
http://thehappycakeandbakeblogger.blogspot.ie/search/label/Pumpkin%20pie
When you add a lolly pop stick to any food your on to a winner especially when kids are involved.
For this recipe you will need:
Home made or shop bought short crust pastry & or puff pastry
Pumpkin purée
Lolly pop sticks
1 egg whisked
Begin by pre heating your oven at 180'c
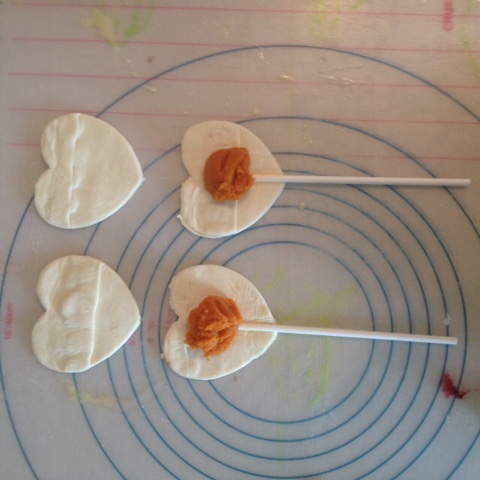
Next roll out your pastry and with your desired cookie cutters cut out an even number and place on a baking tray pre lined with baking parchment. I chose to use a heart shaped cookie cutter.
Take a teaspoon of your pumpkin purée and place in the middle of the heart, dip your lolly pop stick into your whisked egg and press it at the bottom of the pie.
Next place the second heart on top of the first heart and crimp with a fork, lastly brush with the egg wash over the pie.
I baked the pie pops for approx 25mins or until golden brown.
I got very creative whilst making these pie pops and took more tasty condiments from the fridge.
I used home made rhubarb jam, plum jam, peanut butter and raspberry jam, dark chocolate. The flavour choices can be endless.

Enjoy
Rebecca x
Saturday, September 26, 2015
Coconut oil
I love these wonder products that stow away in your press minding their own business until word gets out how amazing and versatile they actually are...

Like the almighty baking soda I use this product in my every day life. In baking as a pesticide and most commonly for me in cleaning the house.

Another wonder product I never let myself run out of is coconut oil. I call it my top to toe inside out product. I use it everyday in baking and cooking, when I'm frying or roasting anything from meat to pancakes. When I'm baking anything for myself and my little girlies il use it as a replacement for butter.

In my beauty regime I use it as a hair mask as it's so conditioning. It's renowned for it's benefits in dental hygiene, the technique word is Pulling. You take a teaspoon of coconut oil place it in your mouth and swish it around for approx 20 minutes. I recommend doing this when you are free from distractions!!!
Iv used a mixture of honey and coconut oil as a face mask which left my skin feeling amazing and why not try a sprinkle of sugar in the oil to make a gentle exfoliant not just for your face but for the whole body.
Another way I use this product is on my animals and as I have dogs, cats and horses in my household I find it so beneficial. Coconut oil has anti bacterial and anti fungal properties so for wound care I would liberally apply it to cuts as it will help fight infection. It can be mixed in with all their foods which will promote gut health.
This summer I found Winston was tormented with grass mites on his legs so I would lash this on and found it really did relieve the itch and helped heal the irritation. From the scratching.

I use cococnut oil as a hoof conditioner on the horses which really helps with the dry cracks and general condition of their hooves in warm dry weather.
Here is an über quick healthy recipe for choc chip banana bread to try out mid week when your trying to eat clean {then indulge on the naughty cakes at the weekend}

For this recipe you will need
3 bananas
1 tablespoon of coconut sugar
1/4 cup of peanut butter
3 tablespoons of coconut oil
2 eggs
1/2 cup of coconut flour
1/2 teaspoon of baking soda
1/2 teaspoon of baking powder
1/2 teaspoon of salt
1/2 cup dark choc chips
Pre heat your oven 160'c. In one bowl add in all your dry Ingredients and the choc chips and mix well.
In another bowl whisk your eggs and when light and fluffy add in the mashed banana and whisk up again.
Lastly add in the coconut oil and peanut butter and mix mix mix until it looks well combined.
Pour the dry Ingredients into the wet and fold altogether.
I used a 1lb loaf tin which I lined with baking paper, once the mixture is poured into the tin pop it in the oven for approx 25-30 minutes.
When the timer goes check the banana bread with a tooth pick and if it comes out clear it's ready to gobble.
I love this banana bread warm with a cup of coffee. I also like to slice it up and freeze the slices as it will keep all week for you.
Enjoy
Rebecca x
Saturday, September 12, 2015
Teddy bear tutorial
Today I thought I would show you something completely different on my blog and that is a step by step guide to making a fondant teddy bear to sit on top of all these cakes Iv been making with you...

For this teddy bear you will need.
Brown fondant
White fondant
Black fondant
Edible glue/water

Start out by taking your brown fondant and breaking off pieces for the body, the head, the arms, the legs and last but not least the little ears.
The body is the biggest part of the bear so begin with that. Take the lump of fondant and roll it in a circle between the palms of your hands.
Once the fondant is smooth and soft gently make the shape of pear by rolling one end of the ball this will give the appearance of the teddies upper body and the rounder part will be the cuddly belly.
Next take the piece of fondant that you put aside for the head and roll it around in a circle between the palms of your hand. Keep doing this until the ball is smooth and soft in texture.
Time to make the teddies limbs you want the legs to be thicker than the arms but you will use the same method for them all.
Roll each limb out like a snake one at a time on the palm of your hand. You want to keep them short and cute as they will just hug the teddies tummy.
For the ears you just want to make two small fondant balls.
So now to assemble, take your body and sit it upright so it slightly flattens at the bottom and can sit on it's own.
Take your glue or water and dab a tiny bit on the top of the body and sit the head on top pressing it down on it.
Next take your legs and flatten one end, paint the glue on the inside of the flattened part and stick to the side of the bottom of the teddy.
Once the legs are on repeat the same method with the arms and stick them onto the teddy at shoulder height with the ends of the arms resting on the legs while hugging the side of the body.
Now glue on the ears.
Take your white fondant and roll out six little balls two for the ends of the arms, legs and lastly the ears. When u have them all rolled out one at a time gently flatten them out with the tip of your finger so it looks like a teeny tiny disk then glue them on like paws and the inside of the ears.
Roll out a slightly bigger ball for the Teddy's face and flatten it like a disk on the palm of your hand. Dab on some glue a sit the fondant on the Teddy's face.
Lastly with the black fondant roll out two tiny balls for the eyes and one slightly bigger ball for the nose.

I made the Teddy's smile by using a knife...

Let me know how you get on with your very own teddy and post it on my twitter @NumNum_Bakes
Enjoy
Rebecca x
Thursday, September 10, 2015
Top uk food blogs
So I'm sitting on a wall near the Red cow hotel waiting for my new tyres to be put on the jeep and I'm scrolling down through my emails mumbling to myself that I need to unsubscribe to half of the spam that comes in.
But today I got a nice email from Rebate zone saying that they have ranked me 31 in their top 50 uk food blogs.
Check out the link below for all the food blogs in the list.
Enjoy
Rebecca x
Thursday, July 30, 2015
The crowd pleaser {chocolate cake}
How can you go wrong with a chocolate cake it is a delight to the senses. The look, the smell, the taste if you can achieve that you're on to a winner. 

Well I have such a cake to share with you today. It has taken a few years to perfect it but after making it a gazzilion times I am proud to say it's ready.
For this recipe you will need:
1 cup of soft real butter
2 1/2 cups of sugar
3 eggs
1 1/2 cups of buttermilk
1 cup of cocoa
3 cups of flour
1/2 teaspoon of salt
1 1/2 teaspoon of baking powder
1 teaspoon of baking soda
40g of butter
500g(1 box) of icing sugar
1/4 cup of cocoa
Begin by pre heating your oven to 160'c
In your food mixer cream the butter and sugar together until light a creamy in texture.
Next in a bowl whisk your eggs together then pour slowly into the butter mixture and combine for another few minutes.
While that's mixing away sieve all your dry ingredients together.
Turn off the food mixer and add in half the dry ingredients combine it either with a spatula or on a slow speed on the mixer.
Next add in the buttermilk, then last but not least add the remainder of your dry ingredients and combine.
For this cake I used 2 8" round silicone cake moulds, you can either line the base with baking parchment or spray them with cake release spray both are widely available in most supermarkets.
Dollop in the gooey cake mix evenly into your tins spread the tops of the batter with a spatula to make sure it's even going into the oven.
Bake for 45mins
While that's baking away and filling your kitchen with the most amazing chocolate aromas prepare to make the buttercream.
Begin by creaming the butter until very pale in colour.
Sieve the icing sugar and cocoa together turn off the mixer then add the sugar in and on a slow setting on the food mixer let them combine. {don't be ballsy and flick the mixer to high speed it ALWAYS turns out bad, trust me} once combine turn it to a med/high speed.
When the cakes are baked check the center of them with a tooth pick if it comes out clean your ready to rock.
Let them cool completely before you divide the cakes into four layers.
Using your spatula dollop a generous amount of buttercream onto your first layer, spread it out evenly then stack the next layer on top then begin again.
When the four layers are on use the remaining buttercream to completely cover the top and sides of the cake using your metal spatula glide it over the surface. Take your time and enjoy, it has to be one of my favourite parts of building a cake.
I finished off this particular cake with flake crumbs sprinkled on the edge of the cake and then adorned the top with flowers .
Perfect for every occasion, like Tuesday morning for breakfast
Enjoy
Rebecca
Friday, July 3, 2015
One word...DOUGHNUTS
I have yet to meet someone that doesn't like some variation of the glorious Doughnut. But the conventional doughnut is fried in oil and either rolled in shiny sugar or dipped in a neon glaze.


 Enjoy Rebecca x
So for today's request from lottie I decided to bake her doughnuts and accompany them with a dark chocolate sauce.
For this recipe you will need
3/4 cup of flour
1 teaspoon of baking powder
40g of soft unsalted butter
1 egg
1/3 cup of sugar
1 teaspoon of vanilla
1/2 cup of milk
75g of 70% dark chocolate
1 tablespoon of butter
Pre heat your oven to 160'c
This recipe is a one pot wonder all you need to do is add all the ingrediants into a big bowl and mix frantically until the batter is smooth and lump free.
Pour the batter into a pipping bag and slowly but surely squeeze it into the doughnut pan, this recipe makes 6 doughnuts which is perfect as most doughnut pans have 6 doughnuts spaces.
While your doughnuts are baking away prepare a Bain Marie then add the chocolate and butter stirring occasionally until it has melted fully. I also poured this oozy combination into a piping bag.
When the buzzer goes on your oven take out the doughnuts and put on the cooling rack. When cooled snip the tip of your piping bag and decorate how you please.
Subscribe to:
Posts (Atom)
